How to Hang a Canvas like a Pro (The Ultimate Guide)
Above, you can see the video on how you can hang canvases bought from us with the help of the hanging kit provided with each canvas.
If you didn't buy canvas from us, below you can find a detailed article on various methods of hanging canvas depending on your situation.
Everything you need to know, from choosing the perfect height to installing safely on any wall type.
Hanging a canvas print seems like a simple job at first glance, hammer a nail into the wall and you’re done, right?
But achieving a truly polished, gallery quality look requires more than basic guesswork. The way you position, secure and present your canvas determines not only its appearance but also how it integrates into the room as a whole.
Poor placement makes even the most stunning artwork look out of place, while proper installation can completely transform the atmosphere of a space.
This comprehensive guide walks you through every step of hanging a canvas, from planning your layout and selecting the right hardware, to levelling, spacing, styling and caring for your artwork.
Whether you’re decorating your first home, enhancing a professional workspace, or installing a multi-piece gallery wall, this article gives you a step-by-step method and all the insider tricks you need.
Understanding Your Canvas: Weight, Thickness and Frame Style
Canvas printing is available in a variety of sizes and styles. And the mechanism you use to tack them on the wall is dependent significantly on its size.
Before you begin, it’s important to assess the physical attributes of your canvas. These factors influence the tools you’ll need and the method you’ll use.
Canvas Weight
Not all canvases weigh the same. Elements that affect weight include:
- Canvas size (e.g., 12x16 inch vs 32x48 inch)
- Wood thickness of the stretcher bars
- Depth of the frame (standard vs deep-edge)
- Additional framing (floating frames add both weight and thickness)
As a general rule:
Small canvases under 1kg can be hung with simple hooks, adhesive strips, or nails.
Medium canvases from 1~3kg require screws, picture hooks, or D-ring and wire systems.
Large canvases from 3~10kg+ should be secured with proper wall anchors or heavy-duty hooks rated for their load.
Never assume; check the weight before choosing a hanging system. It takes just one poorly supported canvas to damage both the wall and the print.
Planning Your Placement: Height, Spacing and Room Considerations
Before picking up a hammer, you should determine where and how your canvas will be placed. Proper placement can elevate the entire room’s aesthetic.
The Golden Rule of Eye-Level Hanging
The standard professional guideline is:
Hang artwork so the centre sits around 145–160 cm from the floor.
This height corresponds to the average person’s line of sight and is commonly used in museums and galleries. However, there are exceptions:
Rooms with high ceilings may benefit from slightly higher placement.
Over furniture, aim for 15–20 cm above the top edge (sofa, headboard, console table).
In hallways, where people view art while walking, you can hang slightly higher.
In children’s spaces, lower placement may suit the room’s function.
Choosing the Right Wall
Your room’s layout influences the best location for a canvas.
Consider:
- Natural focal points: above mantels, beds, or sofas.
- Symmetry: matching the artwork size with the width of the furniture beneath it.
- Lighting: avoid direct sunlight that might lead to fading.
- Traffic paths: ensure the canvas won’t be knocked or bumped.
Wall Colour and Texture
Canvas prints look best when there’s contrast.
- Light walls suit dark, bold canvases.
- Deep-toned walls pair well with bright or minimalist prints.
- Textured surfaces like brick or concrete may require specific fixings.
Previewing Your Layout
Use any of these helpful planning techniques:
Paper templates: Cut brown paper to the exact size of your canvas and tape it to the wall.
Painter’s tape outlines: Create a rectangle the same size as the print.
Digital mockups: Photograph your wall and digitally overlay canvases (many apps help with this).
Floor visualisation: Lay multiple canvases on the floor and experiment with spacing.
Taking the time to visualise prevents mistakes and ensures balance.
Tools and Materials You’ll Need
Professional installers keep their toolkits simple but effective. Here’s what you may need depending on your method.
Basic Tools
- Tape measure.
- Pencil.
- Spirit level or laser level.
- Hammer.
- Drill (for solid walls or heavy canvases).
- Masking tape (for marking positions).
- Stud finder (useful on timber-framed walls).
Hanging Hardware
Depending on the wall type and canvas weight:
- Nails.
- Picture hooks.
- Screws.
- Wall plugs or anchors.
- Adhesive strips (no-damage solutions).
- Sawtooth hangers.
- D-rings.
- Hanging wire.
- Wall bumpers (to protect paintwork).
Safety Equipment
- Protective eyewear when drilling
- Dust sheet for protecting floors
- Rubber gloves (useful when applying adhesive systems)
Be prepared, mid-installation trips to the hardware store are never fun.
Choosing the Right Hanging Method
Different canvases and wall types call for different techniques. Below, we break down the most reliable and widely used options.
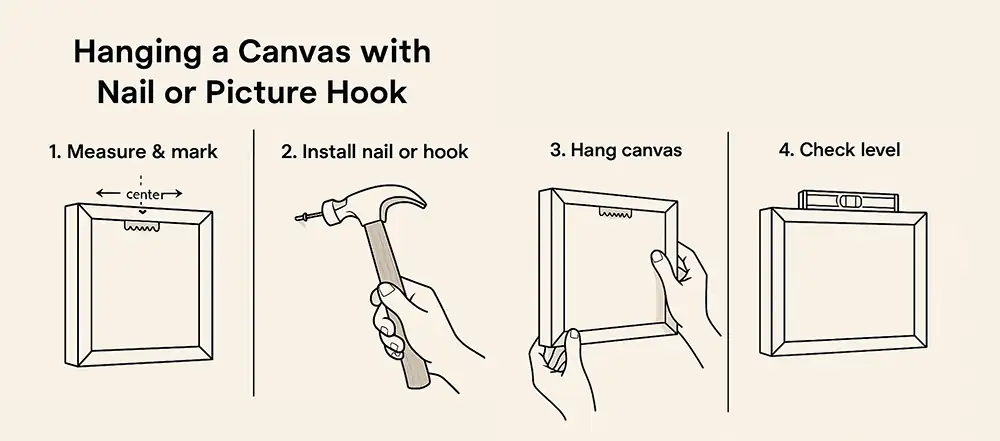
Method One: Hanging a Canvas with a Nail or Picture Hook
Best for lightweight canvases and standard plasterboard or wood walls.
Measure the canvas centre, and find the midpoint on the top edge.
Mark the wall position where the top centre of the canvas should sit.
Account for the hanger drop measure from the top edge to the sawtooth or hanging point.
Transfer that measurement to the wall mark where your nail/hook goes.
Install the nail or hook, leaving 5–8 mm protruding for the frame to catch.
Hang the canvas, gently lift and place it onto the nail.
Use a spirit level across the top edge.
Pros: Simple, Fast, Inexpensive.
Cons: Not suitable for heavy canvases, leaves a visible nail hole.
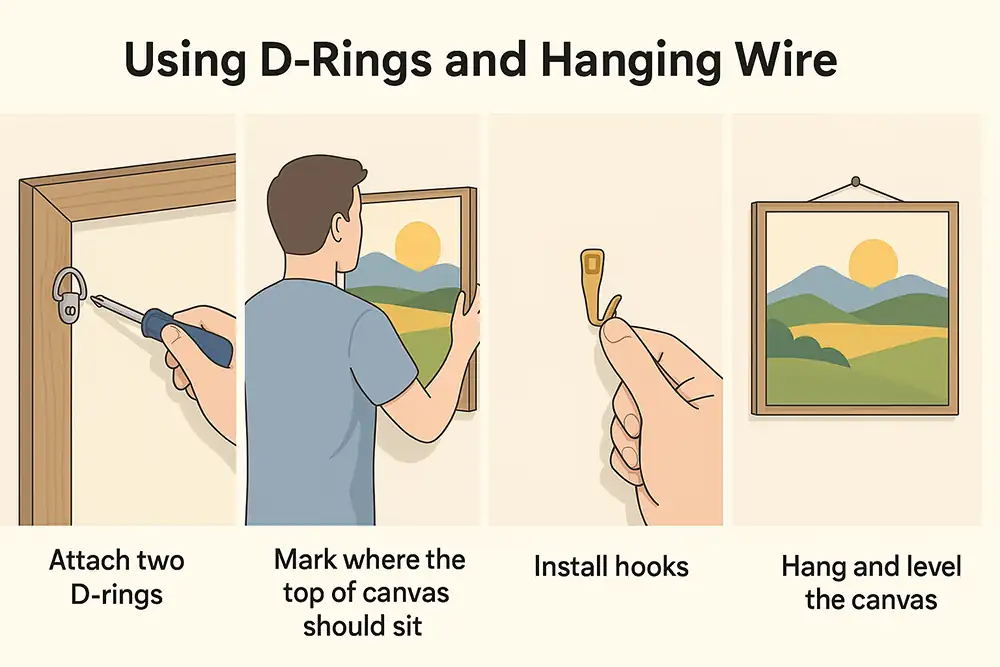
Method Two: Using D-Rings and Hanging Wire
This is the professional choice for large canvases.
Why Use Wire? It distributes weight evenly, allows minor adjustment without rehanging, reduces tilt, and works well with heavy frames.
How to Install
Attach two D-rings on the back of the canvas, one on each side, positioned one-third down from the top.
Thread heavy-duty picture wire between the rings, leaving 5–8 cm slack.
Mark where the top of the canvas should sit on the wall.
Measure the wire drop, pull the wire upward, and note where it naturally peaks.
Mark this point on the wall as your hook location.
Install two hooks spaced slightly apart for added stability.
Hang and level the canvas.
Tips: Use coated wire to avoid fraying. For very wide pieces, use two wires for extra support. Always check the load rating of your hardware.
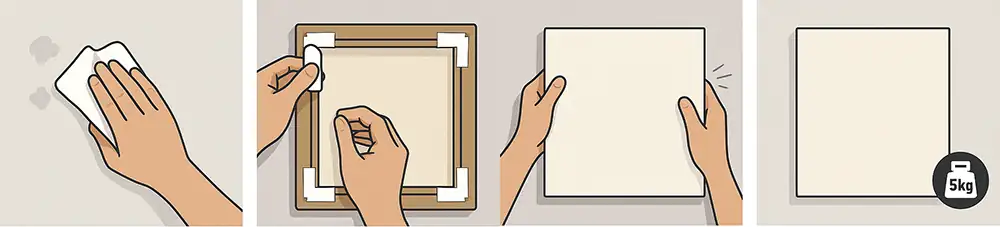
Method Three: No-Drill Solutions (Adhesive Strips and Velcro)
Ideal for rental properties, new walls, or light canvases.
Steps to Use Adhesive Hanging Strips
Clean the wall with an alcohol wipe.
Apply strips to the frame, one on each corner, more for larger canvases.
Press the canvas firmly onto the wall for at least 30 seconds.
Remove and re-press if the product requires curing time.
Check the weight limit carefully; do not exceed it.
Pros: No holes, quick to install, and easy to remove.
Cons: Not ideal for textured walls, not suitable for heavy canvases, and humidity can affect adhesion.

Method Four: Hanging on Brick, Concrete or Masonry Walls
These require specific fixings.
What You Need
- Masonry drill bit
- Wall plugs
- Screws or masonry hooks
- Mask (brick dust can be harmful)
Mark your drill point accurately.
Apply masking tape on the drill location to reduce slipping.
Drill into the wall slowly to avoid cracking.
Insert the wall plug until flush with the wall.
Add a screw or a hook.
Hang and adjust the canvas.
Pro Tip: If you want a no-drill option on brick, strong brick wall hooks exist, but only work on exposed bricks, not plastered surfaces.
Method Five: Hanging on Plaster, Drywall or Hollow Walls
These walls need a gentler touch, so avoid heavy drilling.
Plaster can crack easily. Instead:
- Use wall anchors for medium-weight
- Use toggle bolts for heavier frames
- Use adhesive systems for lightweight pieces
Studs provide strong support for heavy canvases. Use a stud finder or tap the wall:
Hollow sound = no stud
Solid sound = stud present
Creating Stunning Multi-Canvas Layouts
Gallery walls and multi-panel sets (e.g., diptychs, triptychs) are increasingly popular. Here’s how to get them perfect.
Layout Types
Grid layout: perfect squares or rectangles, clean and modern.
Salon style: mixed sizes arranged artistically.
Linear style: canvases aligned along a centre axis.
Staggered: balanced but not perfectly symmetrical.
Spacing Rules
Leave 4–8 cm between canvases for a visually pleasing gap.
Keep spacing consistent across all pieces.
For wide rooms, slightly increase spacing; for narrow rooms, reduce it.
Hanging Multi-Panel Sets
For 2, 3, or 4-piece sets:
Align the top edges OR the centre points (choose one).
Space panels evenly.
Hang the central piece first and build outward.
Visual Balancing Techniques
For tall rooms, use vertical arrangements.
For wide rooms, use horizontal lines.
When mixing sizes, place the largest canvas near the centre.
Levelling Your Canvas: The Pro Tricks
Even a beautiful canvas looks cheap if it’s crooked.
Using a Spirit Level to place the level on the top edge of the canvas and adjust until the bubble is centred.
Laser Leveller: Ideal for multi-canvas walls, gives a perfectly straight guide.
The Tape Trick: Place a small piece of tape on the wall horizontally to act as a guide after measurement.
Anti-Tilt Pads: Stick rubber bumpers to the lower back corners to stop shifting.
Lighting Your Canvas for Maximum Impact
Lighting turns a good display into a professional showcase.
Avoid direct sunlight: It may fade printed colours over time. UV light is harsh on all art, especially ink-based prints.
Artificial Lighting Options
Track lighting: ideal for gallery walls.
Picture lights: mounted above a single canvas.
Spotlights: adjustable and stylish.
LED strips: backlight large canvases for modern ambience.
Lighting Tips: Aim lights at a 30-degree angle to reduce shadows and glare. Use warm light for portraits, cool light for abstract or modern pieces. Avoid reflections on glossy laminates.
Common Mistakes to Avoid
Hanging Too High: This is by far the most common error. Follow eye-level rules.
Using Incorrect Hardware: Using nails for heavy canvases may lead to damage.
Ignoring Wall Type: Brick, plaster, drywall, and concrete all require different approaches.
Not Measuring: “Eyeballing it” rarely works out.
Forgetting About Safety: Children’s play areas, pets and high-traffic walkways need secure mounting.
Protecting and Maintaining Your Canvas
Proper care keeps your canvas looking sharp for years.
Cleaning
Dust with a soft cloth weekly.
For stubborn spots, use a slightly damp cloth (no chemicals).
Never spray household cleaners directly onto the canvas.
Environmental Factors
Keep canvases away from: Radiators, Damp walls, Kitchens (steam and grease), Direct sun.
Re-Hanging or Rotating
Consider changing placement occasionally to refresh your room and reduce light exposure.
Advanced Techniques: French Cleats and Security Mounts
For commercial installations, galleries, and public spaces.
French Cleat System: A strong two-part bracket system. One piece attaches to the wall, one to the artwork. Supports very heavy pieces and ensures perfect alignment.
Security Mounts: Used in hotels, offices, schools, and galleries. Prevents theft. Prevents accidental removal. Keeps artwork perfectly aligned.
Final Checklist Before You Walk Away
Before declaring the job finished:
Is the canvas in the correct position?
Is it level?
Is the spacing right (for multi-canvas setups)?
Are the fixings secure?
Does the canvas sit flush without wobbling?
Do the colours look right under room lighting?
Taking 2 extra minutes now avoids long-term frustration.
Summary: Hanging a Canvas the Right Way
Hanging a canvas isn’t just about attaching something to a wall; it’s about enhancing the entire environment. When done well, it elevates your decor and helps your artwork shine. With the right preparation, tools, and techniques, anyone can achieve a professional result.
Whether you’re installing a single statement canvas or designing a multi-piece gallery wall, remember:
- Plan carefully
- Measure thoroughly
- Choose the right hardware
- Respect your wall type
- Protect your canvas
- Adjust until it looks perfect
You now have all the knowledge needed to hang canvases beautifully, safely, and confidently.
Here is a list of some questions that we often get asked about canvas prints.
- Can I spread one image on multiple canvases?
Definitely! We have many creative variations available for multiple and split photo canvas prints.
- What is the best way to keep the canvas clean?
The best way to keep the canvas clean and enhance its lifespan is to wipe it with a soft duster or slightly damp cloth.
- Can I hang my canvas in the bathroom?
Yes, you can definitely hang your canvas prints in the bathroom, but it's important to apply canvas coating or lamination to protect them from moisture.
- Are Canvas Prints Worth It?
Unlike framed photographs, canvas prints are affordable and give a unique aesthetic to any home. They are simple and inexpensive ways to transform your walls. Above all, they are timeless and always remain in fashion.
If you're searching for ready-to-hang photo canvas prints complete with a complimentary hanging kit, just head to our homepage. Simply upload your picture, and you'll have the choice of various sizes or the option to create a custom-sized canvas print.
Whether you prefer a large photo canvas, a split canvas, or a panoramic photo canvas, we've got you covered.